
Turn Bullet Points Into A Full LinkedIn Post Instantly
Want to turn your bullet points into LinkedIn posts in minutes? Tools like BeLikeNative make it simple. Instead of spending 15–45 minutes manually formatting, you can highlight your notes, choose a tone, and let AI create a polished post in just 2 minutes.
Here’s why it matters:
Transform Any Text, On Any Site, In Seconds
Rephrase, translate, and improve text with one shortcut. Works everywhere you write.
Add to Chrome - It's Free!- Formatted posts perform better: 164% more impressions, 129% higher engagement, and 200% more shares.
- Time-saving: AI tools reduce repetitive tasks by over 90%.
- Mobile-friendly: 67% of LinkedIn users browse on mobile, so clear, scannable posts are essential.
With BeLikeNative, you can refine your bullet points, select a tone, and generate LinkedIn-ready content instantly. Whether you’re sharing key insights or project outcomes, this tool helps you focus on what matters – connecting with your audience.
How To Create KILLER LinkedIn Posts With AI
sbb-itb-32359dc
Preparing Your Bullet Points for Expansion
Before diving into expanding your bullet points, take a moment to organize them effectively. The way you structure these points directly impacts how well they transform into engaging, detailed content. Start by using parallel structure – this means beginning each bullet point with the same grammatical form, such as action verbs like "Increased", "Developed", or "Launched." This technique creates a smooth and consistent flow that’s easy to follow.
Keep your list concise – stick to 3-7 items. If you have more, consider grouping them under subheadings. And always lead with your most important takeaway. Since 67% of LinkedIn users browse the platform on mobile devices, making your content scannable with a clear hierarchy is crucial.
Organizing Bullet Points for Clarity
Each bullet point should focus on one idea. Avoid cramming multiple thoughts into a single sentence. For instance, instead of saying, "Managed team and increased revenue by 30% while reducing costs", split it into two points: "Led a team of 12 sales professionals" and "Increased quarterly revenue by 30%."
Strong action verbs are your best friend here. Words like "Led", "Achieved", "Transformed", or "Delivered" not only grab attention but also clearly communicate the value of your accomplishments. This strategy applies whether you’re summarizing project outcomes, drafting meeting notes, or sharing insights with your audience.
"A well-crafted list can transform intimidating paragraphs into a clear, compelling, and persuasive message that gets absorbed in seconds." – FutureSkillGuides
Once your bullet points are polished, the next step is to define the tone and purpose of your post.
Defining Your Post’s Tone and Purpose
Ask yourself this critical question: "After reading this post, what should my audience think, feel, or do?" The answer will guide everything – from the words you choose to the overall structure of your content. Are you aiming to educate, inspire, spark a discussion, or establish your authority? Each goal calls for a distinct tone.
Align your tone with your objective. For thought leadership, use a professional, confident tone. For personal stories or insights, go for a friendly and approachable vibe. If you’re challenging norms, opt for a bold and innovative style. A great example comes from Katelyn Bourgoin, who shared in September 2025 how her small business generated over $425,000 in just 90 days. By focusing on "proof-based lessons" with specific figures instead of generic advice, her post resonated deeply and drove high engagement. The lesson? Specificity and a clear purpose always outperform vague, generalized content.
Installing and Setting Up BeLikeNative
Get BeLikeNative up and running in just a few minutes. With this tool, you can instantly turn highlighted bullet points from platforms like LinkedIn, Google Docs, or Notion into polished posts. After installation, be sure to review the pricing options to find the plan that suits your needs.
How to Install BeLikeNative
Head to the Chrome Web Store, type in "BeLikeNative: AI Writing with Shortcuts", and hit "Add to Chrome." Once the extension is installed, you’ll notice a small icon in your browser toolbar. To open the side panel, press Alt + E (Windows) or Command + E (Mac). From there, you can select your preferred tone and choose from over 80 available languages.
Understanding the Pricing Plans
BeLikeNative offers four plans to accommodate different levels of usage:
- Free Plan (Free): Includes 5 uses per day with a 500-character limit, ideal for trying out the tool.
- Learner Plan ($4/month): Offers 25 uses daily and a 2,000-character limit, perfect for moderate users.
- Native Plan ($6/month): Provides 50 daily uses, a 4,000-character limit, and priority bandwidth.
- Premium Plan ($14/month): Designed for power users, it includes 125 daily uses, a 6,000-character limit, and additional partnership perks.
All paid plans come with a 7-day free trial. Many users have reported saving over 85 hours each month by streamlining repetitive tasks.
Setting Up Clipboard Shortcuts
In the BeLikeNative dashboard, you can customize keyboard shortcuts to quickly access features like an AI paraphrasing tool or AI grammar fixers. By default, Alt + E (Windows) or Command + E (Mac) opens the side panel. Simply highlight text and use your shortcut to copy AI-generated content instantly. This functionality integrates seamlessly with over 100 platforms, including LinkedIn, Gmail, Slack, and Microsoft Teams.
Step-by-Step Guide: Converting Bullet Points Into LinkedIn Posts
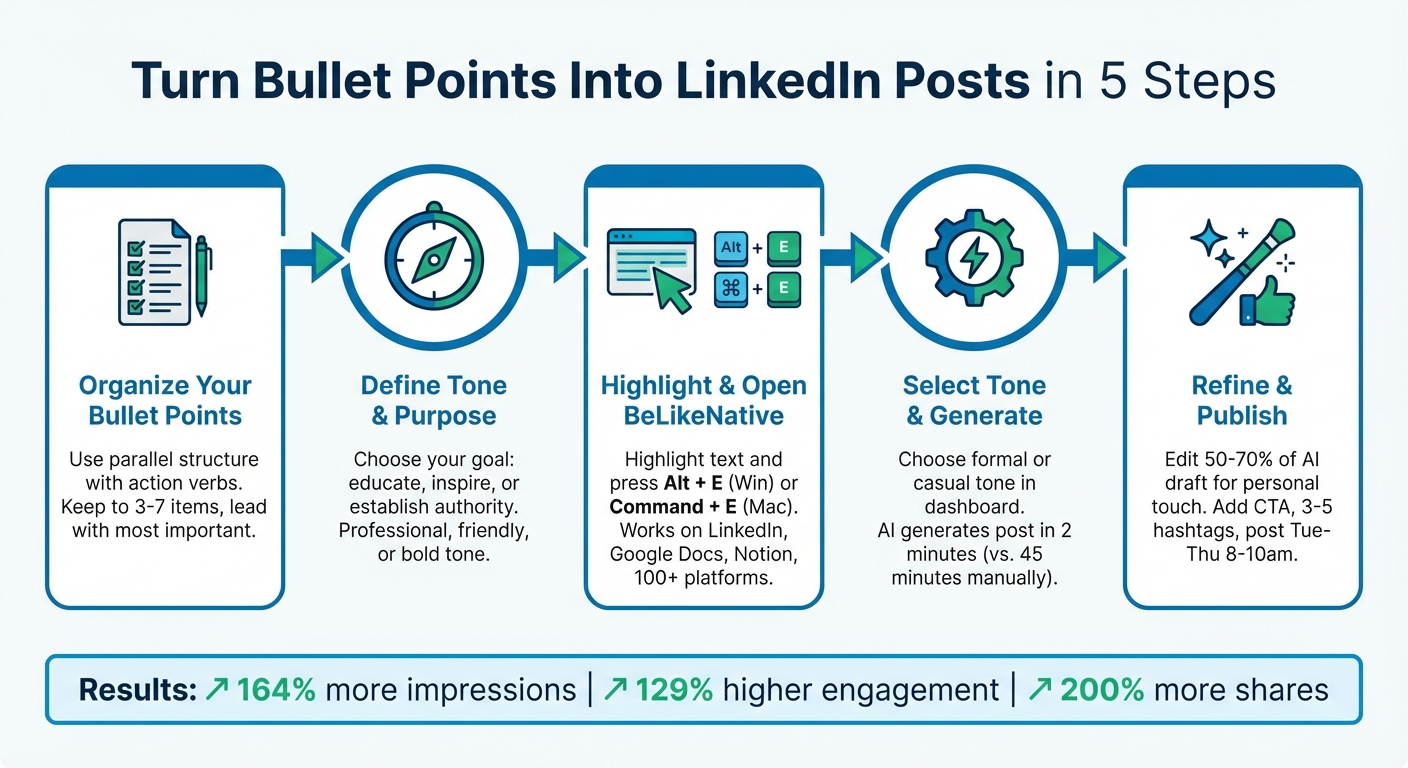
How to Convert Bullet Points to LinkedIn Posts in 5 Steps
Copying and Pasting Your Bullet Points
To get started, highlight your bullet points and use Alt + E (Windows) or Command + E (Mac) to open the BeLikeNative side panel. This tool streamlines your workflow with a simple Highlight → Shortcut → Paste process, allowing you to stay on the same tab without navigating to external AI platforms. This not only helps you stay focused but also improves productivity. Once your bullet points are ready, set your preferred tone to ensure the content resonates with your LinkedIn audience.
Selecting Your LinkedIn Tone and Style
Before generating your post, adjust your tone settings in the BeLikeNative dashboard. Opt for a formal tone when sharing professional updates or industry insights, or go with a casual tone for personal stories or community-focused posts. The tool supports over 80 languages, making it versatile for users worldwide. By choosing the right tone, you can turn basic bullet points into engaging LinkedIn posts. According to research, professionals using AI assistance can create 59% more documents per hour, emphasizing the value of aligning your tone with your audience from the beginning.
Generating and Refining Your Post
Once your tone is set, use BeLikeNative’s features to polish your post. Choose tools like Paraphraser to turn bullet points into smooth sentences or Fix Grammar for a polished finish. The AI-generated post is automatically copied to your clipboard, ready for you to paste directly into LinkedIn. If the output feels too dense, try tools like Simplify This or Summarize to make it more concise. Experts suggest editing 50–70% of the AI-generated draft to add your personal touch and ensure the post feels genuine. Users report significant productivity improvements when converting bullet points into posts using this efficient process.
Optimizing and Publishing Your LinkedIn Post
Once your post is polished, it’s time to focus on formatting and engagement to ensure it stands out.
Adding Calls to Action and Formatting
Wrap up your post with a strong call-to-action (CTA) that encourages readers to engage. Use open-ended questions to spark discussions or invite readers to share their experiences. These types of questions can generate up to 100–150% more comments than simple yes/no questions. For example, instead of asking, "Do you agree?" try something like, "What’s been your biggest challenge when creating LinkedIn content?"
If your goal is to drive specific actions, make your directive clear. Use phrases like, "DM me ‘BOOKED’ for the full breakdown" or "Drop your thoughts in the comments" [18,35]. Adding visual cues such as emojis (e.g., 👇, 📌) can help draw attention to your CTA.
When it comes to hashtags, keep it simple. Stick to 3–5 relevant hashtags at the end of your post to boost visibility without overwhelming your audience. Avoid inserting external links directly in the post body, as LinkedIn’s algorithm may penalize your reach by up to 3× to 5×. Instead, place the link in the first comment after publishing.
With these CTAs and formatting tweaks, your post will be primed for engagement.
Best Practices for Posting on LinkedIn
Before hitting publish, preview your post on mobile – about 60% of LinkedIn users access the platform this way. Make sure your main message is within the first 125–150 characters to grab attention. Break up your text into 1–2 line paragraphs with plenty of white space, as well-spaced posts can gain 57% more engagement.
Use bold text strategically, limiting it to 5–10% of your content. Highlighting key stats or takeaways this way can boost view rates by 50%. After publishing, respond to comments within 2–4 hours to keep the conversation going and improve engagement.
Timing also matters. Post between Tuesday and Thursday, ideally between 8–10 a.m. or 12–2 p.m. in your audience’s time zone, for maximum visibility [32,37]. Properly formatted posts can achieve a 164% increase in impressions and a 129% higher engagement rate compared to plain text.
Conclusion: Transform Bullet Points with BeLikeNative
Turning bullet points into polished LinkedIn posts doesn’t have to be a time sink. BeLikeNative streamlines the process, cutting formatting time from 45 minutes to just 2 minutes. With keyboard shortcuts like Alt/Command + E, you can highlight, refine, and paste seamlessly without disrupting your workflow.
The tool ensures your posts stand out, delivering 164% more impressions and a 129% higher engagement rate compared to plain text, as previously mentioned. By incorporating bold text, clean line breaks, and a clear visual structure, BeLikeNative creates content that’s easier for the brain to process – 40% faster, to be exact. Plus, its multilingual support and tone customization keep your brand voice consistent across all platforms.
Users have taken notice too, with BeLikeNative earning a 4.6/5-star rating on the Chrome Web Store. This reflects its ability to transform rough ideas into polished, professional content through a clean, intuitive interface. Whether you’re repurposing webinar notes or expanding meeting highlights, the tool handles the formatting so you can focus on adding the personal touch that makes your posts resonate.
Start with the free Free plan to get a feel for the workflow, or upgrade to the Learner plan at $4/month for 25 daily uses and a 2,000-character limit. With its scalable pricing and cross-platform functionality, BeLikeNative helps you spend less time on tedious formatting and more time connecting with your audience. Ready to elevate your LinkedIn posts? Turn your bullet points into engaging content today.
FAQs
How many bullet points should I start with?
When writing a LinkedIn post, there’s no magic number of bullet points to include. What matters most is clarity and impact. That said, starting with 3 to 5 concise points can help structure your thoughts and grab attention. Keep each point short and purposeful to make your post easy to read and impactful.
How do I make the AI post sound like me?
To give an AI-generated LinkedIn post a personal touch, tweak the draft to reflect your tone, experiences, and personality. Use language that feels natural to you – maybe throw in a conversational phrase or two – and don’t hesitate to share a quick anecdote or insight from your own life. This way, the post will feel more you and connect better with your audience, striking that balance between professionalism and relatability.
Will adding a link hurt my LinkedIn reach?
Adding a link to a LinkedIn post can decrease its reach by roughly 10–15%. Why? LinkedIn tends to favor content that keeps users on the platform. If you use UTM codes or tracking links, the reach might drop even further.
To reduce this impact, think carefully about how you include links. For example, placing them in the comments instead of the main post might help. At the same time, focus on keeping your tone engaging and professional to maintain audience interest.
Related Blog Posts
- How to Reword Any Text Like a Pro – AI Tools That Make Rewriting Effortless!
- Convert Informal Text To Formal With Ai For Professional Writing
- Make Your LinkedIn Comments Sound Professional Instantly
- Turn Bullet Points Into Full Paragraphs Automatically
BeLikeNative fixes grammar, rephrases, translates, and simplifies text on any website in 1 second — just highlight and hit a keyboard shortcut. No tab switching. Try it free →
